Introduction
AI is revolutionizing the world. Face recognition is one such spectrum of it. Almost most of us use face recognition systems. They are everywhere. One can find them in devices like our mobile or platforms like Facebook or applications like Photo gallery apps or advanced security cameras.
In this blog, we are going to have our hands dirty with facial recognition in python and learn how can we train a model to learn faces from images! Before we start with the implementation, let us dive down a little into basics of face recognition theory
What is Face Recognition?
The issue is answered by a face identification scheme: does an image’s face match the image’s face? A face recognition scheme requires a face picture and predicts if the face corresponds to other pictures in the database supplied. Face-recognition schemes have been developed to compare and forecast possible face match irrespective of speech, face hair, and age.
Facial recognition is the process of identifying or verifying the identity of a person using their face. It captures, analyzes and compares patterns based on the person’s facial details.
- The face detection process detects and points out human faces in images.
- The face capture process transforms camera feed (a face) into a set of mathematical representation based on the person’s facial features.
- The face match process verifies if two faces are of the same person.
Today it’s considered to be the most natural of all biometric measurements.
What are the Steps in Face Recognition?
Step 1: Detecting the Faces
Step 2: Face Landmark Estimation
Moreover, we have to cope with issues such as faces in various directions. Such images look completely different from a computer and the similarity between them on their own can not be found. We can use an algorithm known as face-point assessment to do this. Vahid Kazemi and Josephine Sullivan have created an strategy in 2014. The fundamental concept is that we will have 68 particular points on every face (called sights). Once we understand where there are distinct face characteristics, we can scale the picture for a single person, spin it and shear it.
Step 3: Face Encoding
We need a way to obtain a few fundamental readings from each face at this point. Then we could evaluate the unfamiliar face in the same manner and discover the most close-known face. This can be done with profound teaching (CNNs). Incorporation of characteristics from prior measures must be created. We can once recognize this embedding for an unidentified face.
Step 4: Classifying Unknown Faces into Known Ones
In fact, this is a simpler phase. All we have to do is discover the individual who has the nearest measurement to our sample picture in our database of recognized individuals. We can do this using an algorithm for fundamental teaching machines. All we have to do is train a classifier to measure from a fresh sample picture and show which recognized individual is nearest to each other. It requires milliseconds to run this classifier. The classificator outcome is the person’s name!
Transfer Learning for Face Recognition
Transfer training is a computer training process in which a model created for a job is used again as the basis for a second job model. It is an approach popular in the field of in-depth learning, where prequalified models are used to start computer vision and natural language treatment work, given the huge computer and time resources required to develop neural network models on these problems. We use transfer learning in our blog as well. For face detection and recognition, we use pre-built designs. Training a face recognition model is a very costly job. You need a bunch of information and computing energy to train profound facial recognition teaching models.
For our assignment, we will currently use python’s facial recognition library. The book uses the profound teaching model educated by a threefold loss function. The Siamese network we call. “Siamese” implies linked or attached. Perhaps you heard of Siamese twins? Siamese networks may be formed by convolutionary structures and dense or layers of LSTM. We will use the Convolutionary Siamese Network since we will cope with pictures to identify the faces. You can understand the architecture by this image :
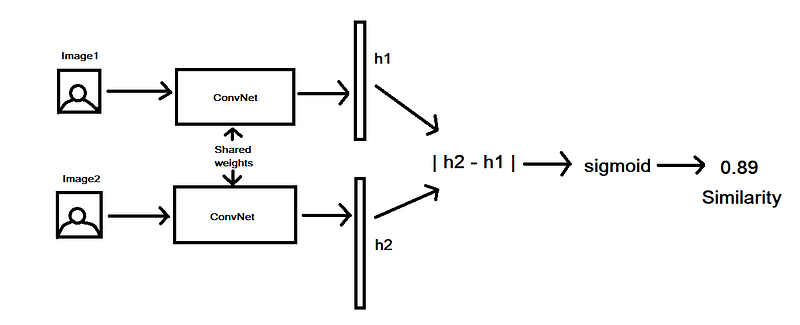
This is the fundamental algorithm:
- we take two photographs (Figures 1 and 2). The last layer of the CNN generates a permanent shape matrix (picture embedding), the last part of which is the CNN. We get two embeddings as two pictures are feed. (h2 and h1). (h1).
- The absolute range is calculated between the vectors.
- Then a sigmoid function passes through measurements and the resemblance value is generated.
- The scores are nearer to 1 if the pictures are comparable or nearer to 0.
Implementation
Getting the libraries
The first step is to load all the libraries. We will be using the face_recognition library for detection and recognition in this case. This library provides out of the box methods to perform various tasks involved during a facial recognition process.
## Importing the libraries
import face_recognition
import argparse
import pickle
import cv2
import os
from imutils import paths
import matplotlib.pyplot as plt
import numpy as np
import time
Generating the Encodings for the Knows Users
In this section, we are trying to convert images of the known users into a mathematical representation. This mathematical representation is a high dimensional vector. We can call this high dimensional vector as an embedding. Each image has it’s own 1 embedding. These embeddings are important to describe an image in a high dimensional space.
The code below tries to identify a face in a given image. Once the model detects the face, it extracts out facial features and passes them to another model which converts these features into a mathematical representation known as embeddings. In the end, we collate all the images and their corresponding embedding in a list.
This is a set of true values for us. All the users present in this list are the ones which we want to recognize correctly. Any user out of this set should be called out as an “unknown” by the model!
imagePaths = list(paths.list_images("./holdout_known//"))
knownEncodings = []
knownNames=[]
for (i, imagePath) in enumerate(imagePaths):
  # extract the person name from the image path
  print("[INFO] processing image {}/{}".format(i + 1,len(imagePaths)))
  name = imagePath.split(".")[-2].split("/")[-1]
  # load the input image and convert it from RGB (OpenCV ordering)
  # to dlib ordering (RGB)
  image = cv2.imread(imagePath)
  rgb = cv2.cvtColor(image, cv2.COLOR_BGR2RGB)
  # detect the (x, y)-coordinates of the bounding boxes
  # corresponding to each face in the input image
  boxes = face_recognition.face_locations(rgb,model="hog", number_of_times_to_upsample=1)
  # compute the facial embedding for the face
  encodings = face_recognition.face_encodings(rgb, boxes, num_jitters=3)
  # loop over the encodings
  for encoding in encodings:
     # add each encoding + name to our set of known names and
     # encodings
     knownEncodings.append(encoding)
     knownNames.append(name.split("_")[0].lower())
print("[INFO] serializing encodings...")
data = {"encodings": knownEncodings, "names": knownNames}
f = open("encodings.pickle", "wb")
f.write(pickle.dumps(data))
f.close()
Matching New Users
In the previous section, we generated embeddings for known users. Now, we need to generate these embeddings for the new test users whom we want to predict through our model.
We have a written a predict face utility function which will take in the input path of the test image and will return the name of the recognized person!
def predict_face(image_path):
    image = cv2.imread(image_path)
    rgb = cv2.cvtColor(image, cv2.COLOR_BGR2RGB)
    boxes = face_recognition.face_locations(rgb,model="hog",number_of_times_to_upsample=3)
    encodings = face_recognition.face_encodings(rgb, boxes) #num_jitters=100
    names = []
    # loop over the facial embeddings
    print("[INFO] loop over the facial encodings")
    for encoding in encodings:
    # attempt to match each face in the input image to our known
    # encodings
    matches = face_recognition.compare_faces(data["encodings"],
    encoding, tolerance=0.45)
    name = "unknown"
    # check to see if we have found a match
    if True in matches:
       # find the indexes of all matched faces then initialize a
       # dictionary to count the total number of times each face
       # was matched
       matchedIdxs = [i for (i, b) in enumerate(matches) if b]
       counts = {}
       # loop over the matched indexes and maintain a count for
       # each recognized face face
       for i in matchedIdxs:
         name = data["names"][i]
         counts[name] = counts.get(name, 0) + 1
         # determine the recognized face with the largest number of
         # votes (note: in the event of an unlikely tie Python will
         # select first entry in the dictionary)
         name = max(counts, key=counts.get)
    return name
Getting the Predictions
The previous utility function takes one image as input. Below code, basically iterates over multiple test images present in a folder. It passes it to the predict function and collects the predicted name. All the results are stored in a data frame!
test_images_folder = "./testImages/"
actual=[]
predicted=[]
start_time = time.time()
for filename in os.listdir(test_images_folder):
   img = cv2.imread(os.path.join(test_images_folder,filename))
   actual.append(str(os.path.join(test_images_folder, filename).split("_")[0]).split("/")[2].split(".")[0].lower())
   if img is not None:
     #path = os.path.join(test_images_folder, filename).split("/")[2].split(".")[0]
     #img = cv2.imread(path)
     matched_person = predict_face(os.path.join(test_images_folder,filename))
     predicted.append(matched_person)
   else:
     print("No Image found")
Calculating Model Metrics
This is an extension to measure the metrics of the model. We are calculating accuracy, specificity, recall and F1 score of our face prediction model.
import pandas as pd
from sklearn.metrics import confusion_matrix
dataframe = pd.DataFrame({"Actuals":actual, "Predicted":predicted})
confusion_matrix=confusion_matrix(dataframe["Actuals"], dataframe["Predicted"])
FP = confusion_matrix.sum(axis=0) - np.diag(confusion_matrix)
FN = confusion_matrix.sum(axis=1) - np.diag(confusion_matrix)
TP = np.diag(confusion_matrix)
TN = confusion_matrix.sum() - (FP + FN + TP)
# Sensitivity, hit rate, recall, or true positive rate
TPR = TP.sum()/(TP+FN).sum()
# Specificity or true negative rate
TNR = TN/(TN+FP)
# Precision or positive predictive value
PPV = TP/(TP+FP)
# Negative predictive value
NPV = TN/(TN+FN)
# Fall out or false positive rate
FPR = FP.sum()/(FP+TN).sum()
# False negative rate
FNR = FN/(TP+FN)
# False discovery rate
FDR = FP/(TP+FP)
# Overall accuracy
ACC = (TP+TN).sum()/(TP+FP+FN+TN).sum()
# Recall
Recall = (TP.sum()/(FN+TP).sum())
# Specificity
Specificity = 1-FPR
print(ACC)
print(Recall)
print(Specificity)
Summary
Security is now one of the areas that most use face recognition. Facial recognition is a very efficient instrument which enforcers can use the technology to identify criminals and software businesses to assist consumers to access the technology. It is possible to further develop this technology to be used in other ways, like ATMs, private records or other delicate equipment. This may outdated other safety steps, including passwords and buttons.
In the subways and in the other rail networks, innovators also seek to introduce facial identification. You want to use this technology to pay for your transport charge, using faces as credit cards. The facial recognition takes your picture, runs it through a scheme and charges the account you have earlier developed instead of getting to go to a stand and purchase a ticket. This can rationalize the method and dramatically optimize traffic flow. Here’s the future.
Follow this link, if you are looking to learn data science online!
You can follow this link for our Big Data course! This course will equip you with the exact skills required. Packed with content, this course teaches you all about AWS tools and prepares you for your next ‘Data Engineer’ role
Additionally, if you are having an interest in learning Data Science, click here to start the Online Data Science Course
Furthermore, if you want to read more about data science, read our Data Science Blogs
